GitHub Student Pack Rejections? A Repeatable Process That Worked for Me
Background
AI is moving fast, and Agent-based workflows have been everywhere since last year. But as a student, the cost of tokens and subscriptions is a real wall — most people can’t get past surface-level web chat because the free quotas just aren’t enough to do anything meaningful.
If you spend time in an IDE, you’ve probably noticed GitHub Copilot sitting there as a plugin in VS Code and others. It started as an ask mode, and as agent tech evolved, it grew into something that can edit code, create files, and run commands for you. That said, I don’t think having an Agent means you can skip the fundamentals. As I’ve written before, architectural judgment only gets more important — if you genuinely don’t know how things should fit together, AI won’t save you. It’ll just help you build a mess faster. My reason for recommending Agent is simpler: you have to start using the tools before you can get good at using them. Things are moving fast and every iteration builds on the last. If you can’t even handle an Agent, good luck with OpenClaw or Harness Engineering.
Take my own experience with Prompt engineering. I heard about it early on but never paid much attention. My feeling is that web chat interfaces are naturally a poor fit for serious Prompt work — it often involves multiple files with different purposes, like behavior constraints in one file and process definitions in another. Plus most people’s web chat sessions are inconsistent, separated by time gaps. You might start off being careful about your prompts, but before long you’re just typing whatever. That makes any real Prompt engineering nearly impossible to sustain. So for a long time I stuck to a simple formula: assign a role, set some constraints, state the goal — and that was only at the start of a conversation. After that I’d just go with the flow. But once I started working on bigger projects, it all fell apart. Agent plus structured Prompt engineering is the real answer — using an Agent forces you to level up your Prompt skills, and together they form a proper system for getting things done with AI.
Even ChatGPT is pivoting hard in this direction, pushing Codex with both a desktop app and IDE plugins. These all come with free quotas, but same old problem — the quotas are tiny. Agent workflows require constant file reads and writes, which burns through tokens fast. Free tier runs out after a handful of exchanges.
Thankfully, GitHub has had the Student Developer Pack for a long time. I originally signed up mostly for the JetBrains all-products license, then gradually started using Copilot’s ask mode, and now I run the agent for my daily work. The requirements are simple: a student email and some proof of enrollment, and you get Copilot Pro. Sure, the March cuts locked some frontier models behind additional paywalls or API keys, but on the whole it’s still pretty generous.
The problem is, the review process has gotten noticeably stricter. A lot of people get stuck at the verification stage and their uploads keep getting rejected. It used to be enough to upload a student ID or campus card — now you need CHSI verification with English translation, and your IP gets checked too. I’ve had juniors and classmates ask me about this, but every guide I found online had issues: nobody mentions the IP check, and the CHSI translation steps are way more convoluted than they need to be. So I decided to write my own guide — partly to stop repeating myself, partly to help anyone else going through the same thing.
This guide focuses on Chinese university students since the CHSI and IP complications are specific to that context. If you’re applying from elsewhere, the general flow still applies — just swap CHSI for your country’s equivalent enrollment proof.
The Process
Step 1: GitHub Account & Student Email
First, you need a GitHub account. Go to github.com/join and sign up with your regular personal email. Don’t use your student email as the primary account — many schools reclaim email addresses after graduation, and migrating a GitHub account is a headache.
Once registered, go to Settings → Access → Emails, add your .edu or .edu.cn school email, and verify it through the confirmation email.

If you registered your GitHub account directly with an edu email, you can skip this step. But if your school doesn’t provide student emails, upload your CHSI verification PDF later with a note — I’ve seen this work.
Step 2: Billing Information (Boosts Approval Odds)
To improve your chances, head to Billing → Payment Information and fill in your billing details:
- Name: Use pinyin, given name first. Match the translated name on your CHSI report
- Address: Grab the English address from your school’s official website footer (use your specific campus)
- VAT: Leave it blank — there’s no actual payment info involved
Click “Save billing information” when done.

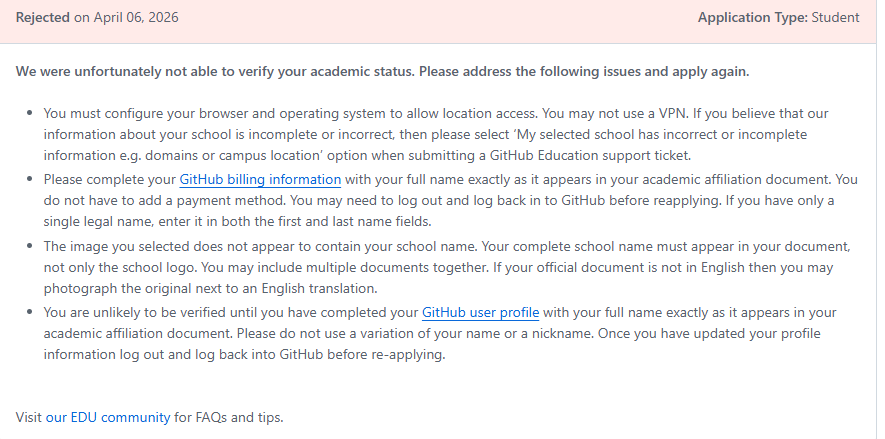
Don’t worry about charges — Copilot Pro is fully free while your Student Pack is active. This is purely for identity verification. The image below shows common rejection reasons GitHub sends out; note that missing billing info and IP/location mismatch are explicitly flagged:
Step 3: CHSI Verification & Translation
This is the most time-consuming step and where most rejections happen. GitHub’s review team can’t read Chinese — submitting a Chinese-language report will almost certainly get it bounced.
Part A: Get the Chinese Online Verification Report
- Go to the CHSI Archive and log in
- Under “Online Verification Reports,” find “教育部学籍在线验证报告” (Online Verification Report of Student Record) and apply. You’re applying for the Chinese version here — CHSI charges 30 CNY for their official English version, which is overkill for a GitHub Student Pack application
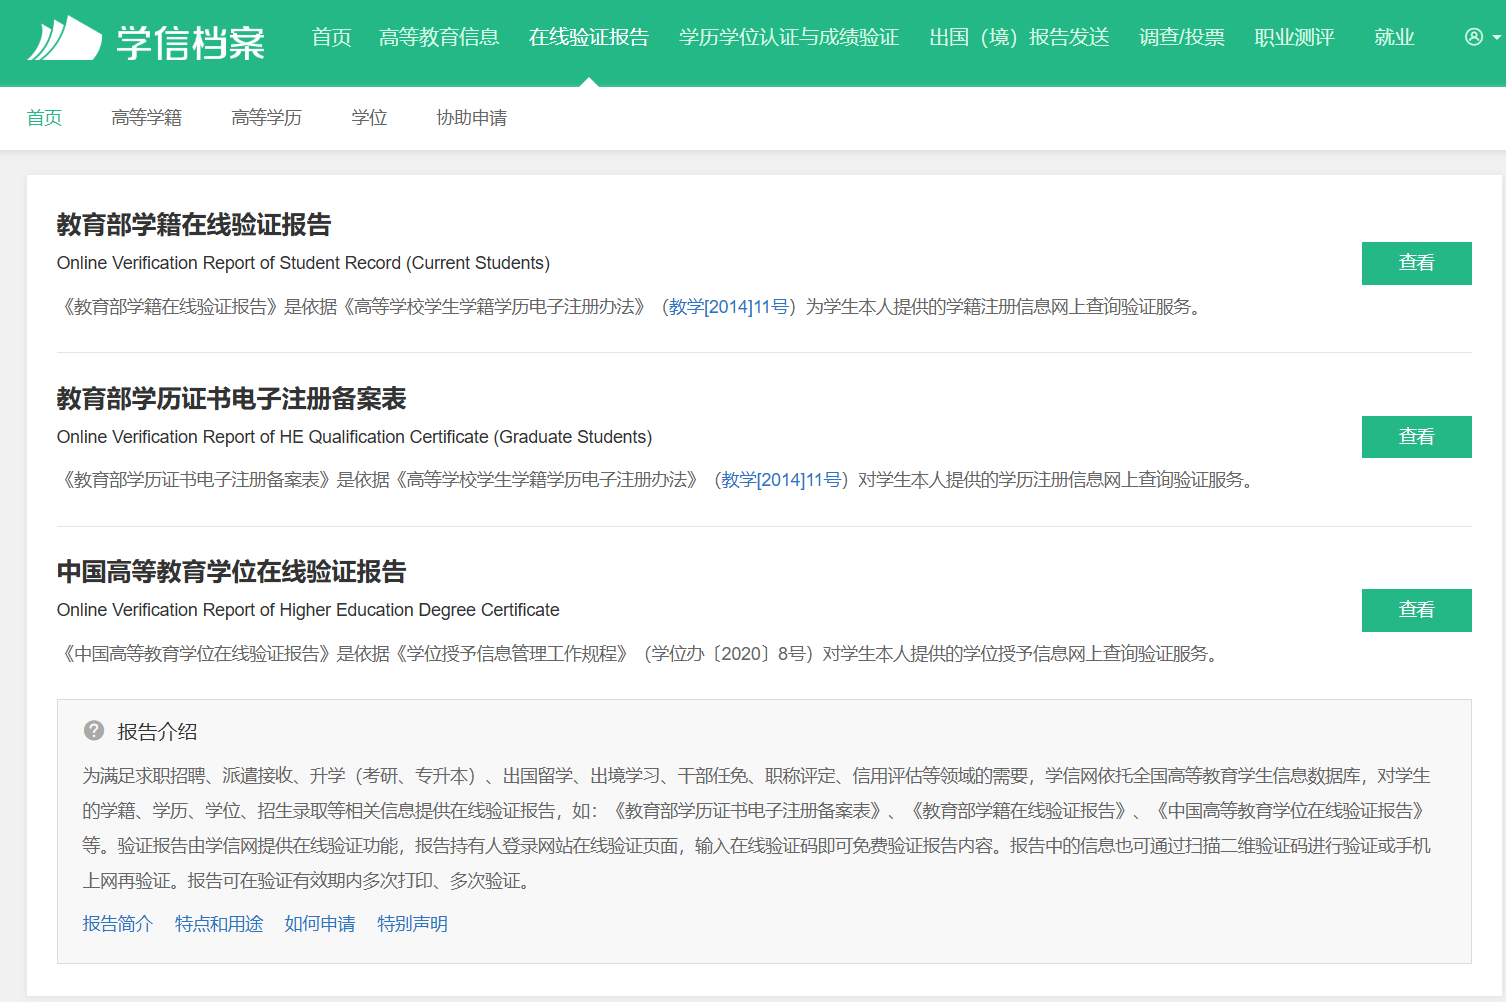
- Once issued, click the download button in the top right corner to save the PDF

Part B: Translate the PDF to English
Now you need to translate it. I can’t recommend iLovePDF enough — it’s hands down the best online PDF tool I’ve used. Free, clean interface, actually well-designed. Their sister site iLoveIMG handles basic image editing too. For desktop PDF reading, Adobe Acrobat DC is still king.
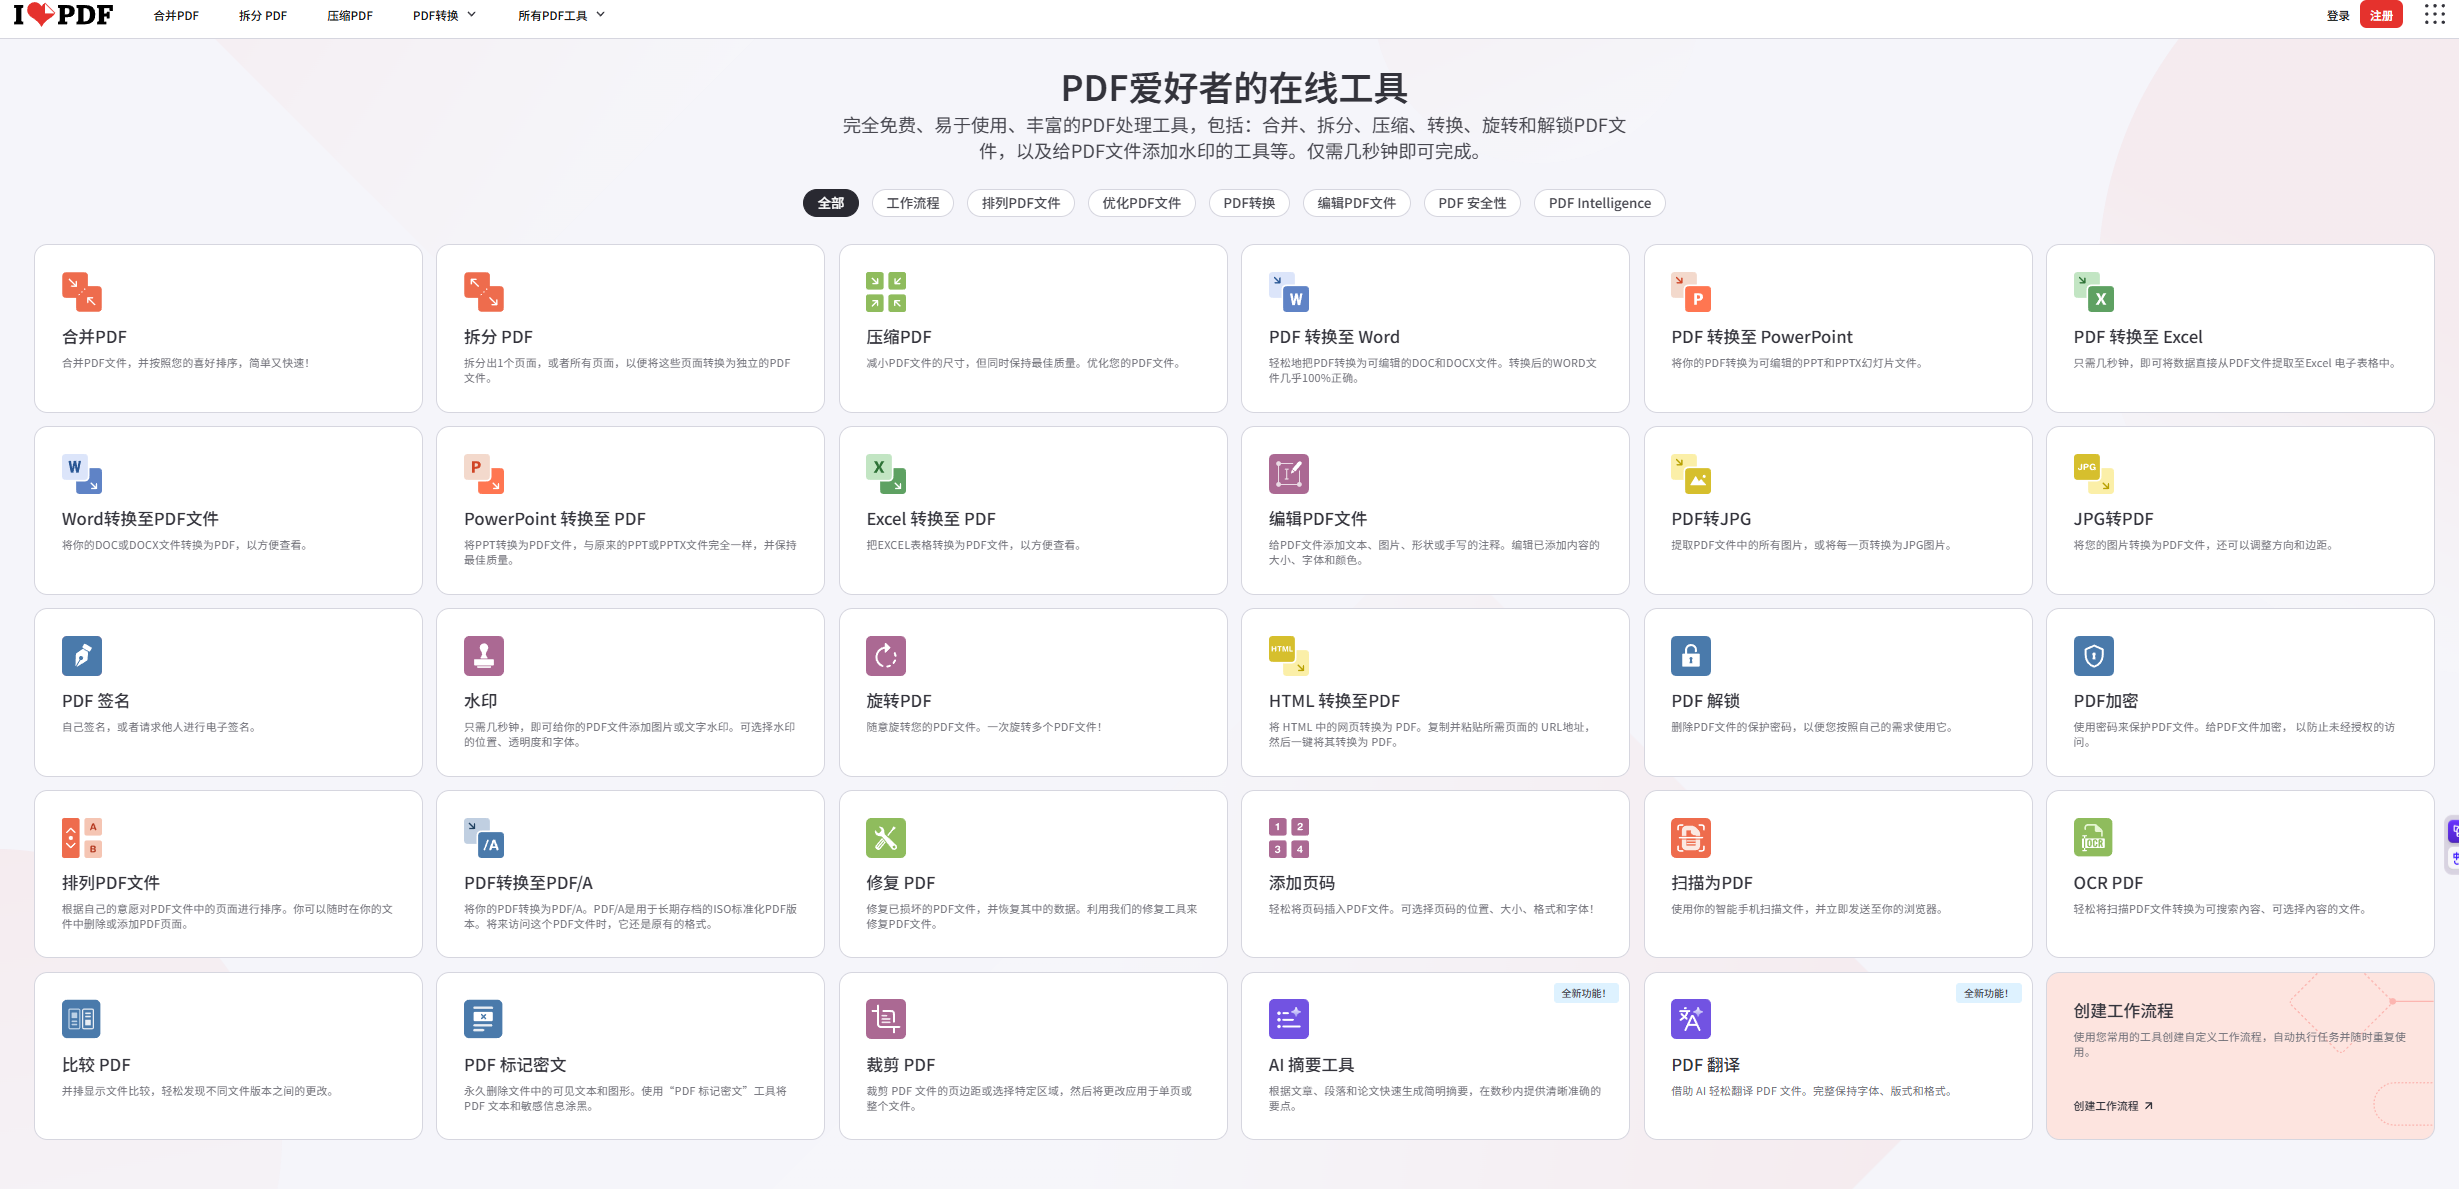
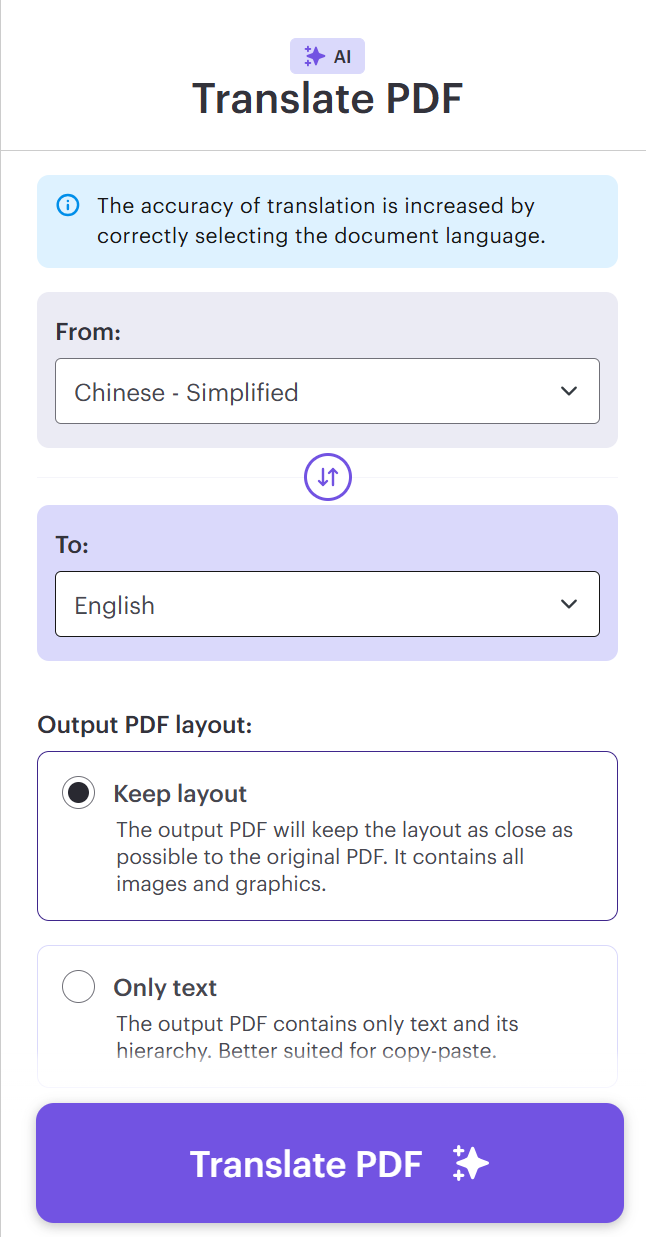
Here’s how: open the site, scroll to the very bottom, and find the “Translate PDF” tool. Upload your Chinese report and set the translation to Chinese → English (if the Chinese UI doesn’t show English as a target language, toggle the site to English first). When the translation is done, double-check that the key fields are intact and legible: your name, school name, enrollment status, and validity period.
Step 4: Submit the Application
Once all that’s ready, go to github.com/settings/education/benefits and click “Start an application.”
Walk through the form:
- Select “Student” as your role
- Find and select your school — “Select this school” (double-check the English spelling if it doesn’t show up)
- Click “Share Location” (allow the browser location request if prompted), then “Continue”
- This is the IP/location checkpoint — don’t use a VPN. Make sure you’re on your campus network or school VPN. If your university has multiple campuses, pay attention to which one you’re associated with
- Under “Proof,” choose “Dated school ID” and upload your translated verification report
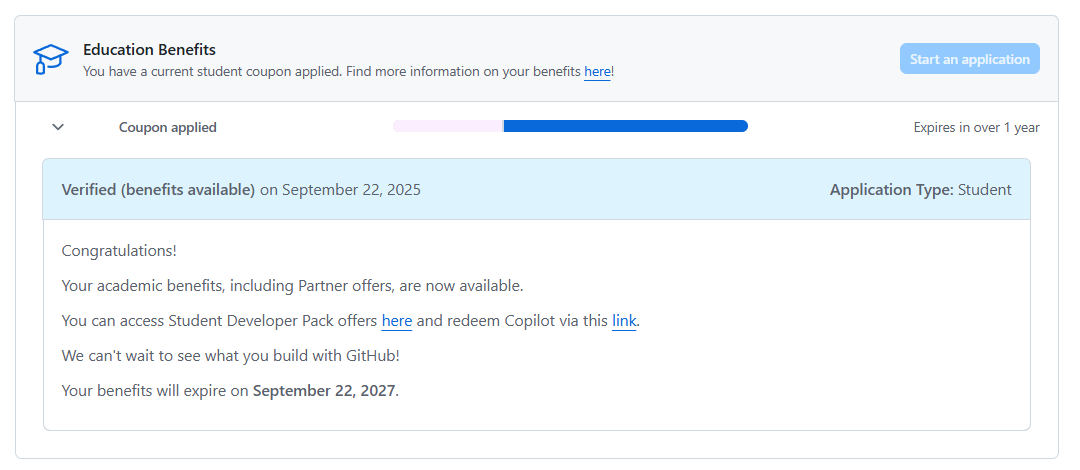
The review turnaround is pretty fast — same-day rejections are common too. If you get rejected, check the feedback they give and fix whatever they flagged. CHSI verification reports usually pass on the first try; student ID card photos barely work anymore. Note: benefits take 1-3 days to fully activate after approval.
Once approved, head to the GitHub Student Developer Pack to see your benefits:

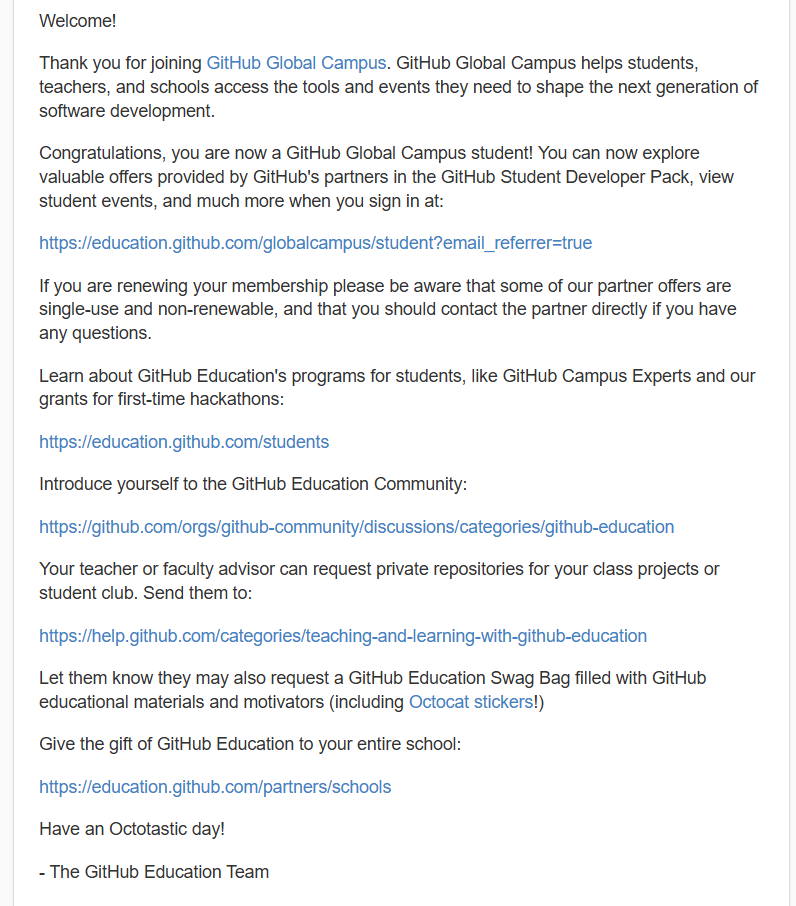
You’ll also get a confirmation email:
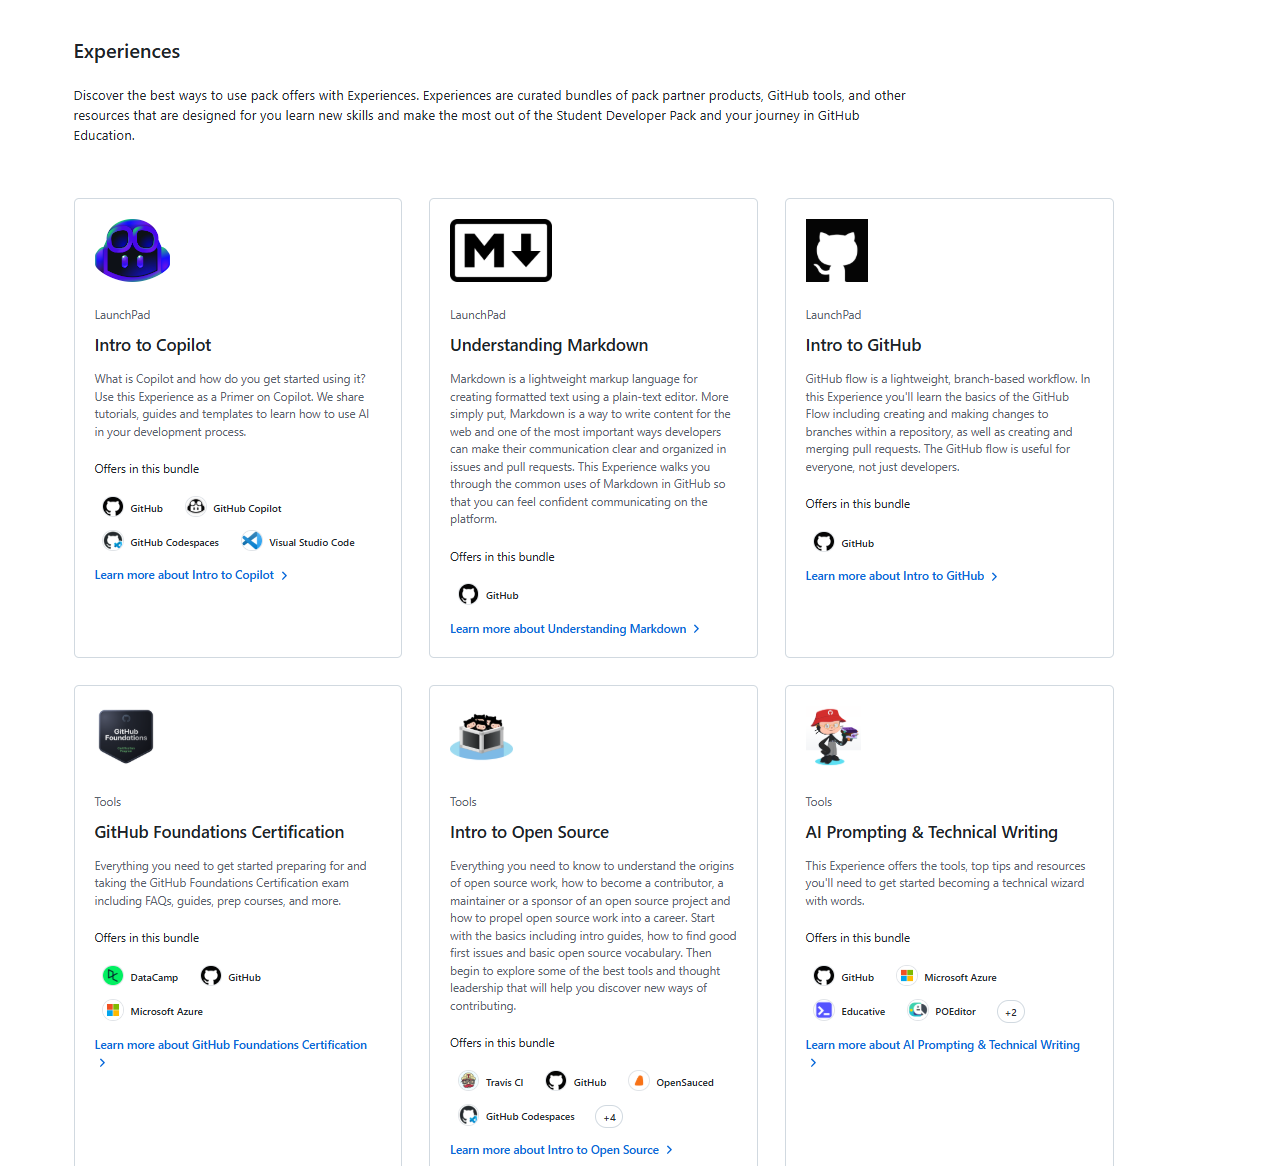
The most useful perks are Copilot Pro, JetBrains all-products (PyCharm, IDEA, etc.), and 1Password. There’s also free server credits, course access, and more — worth exploring:
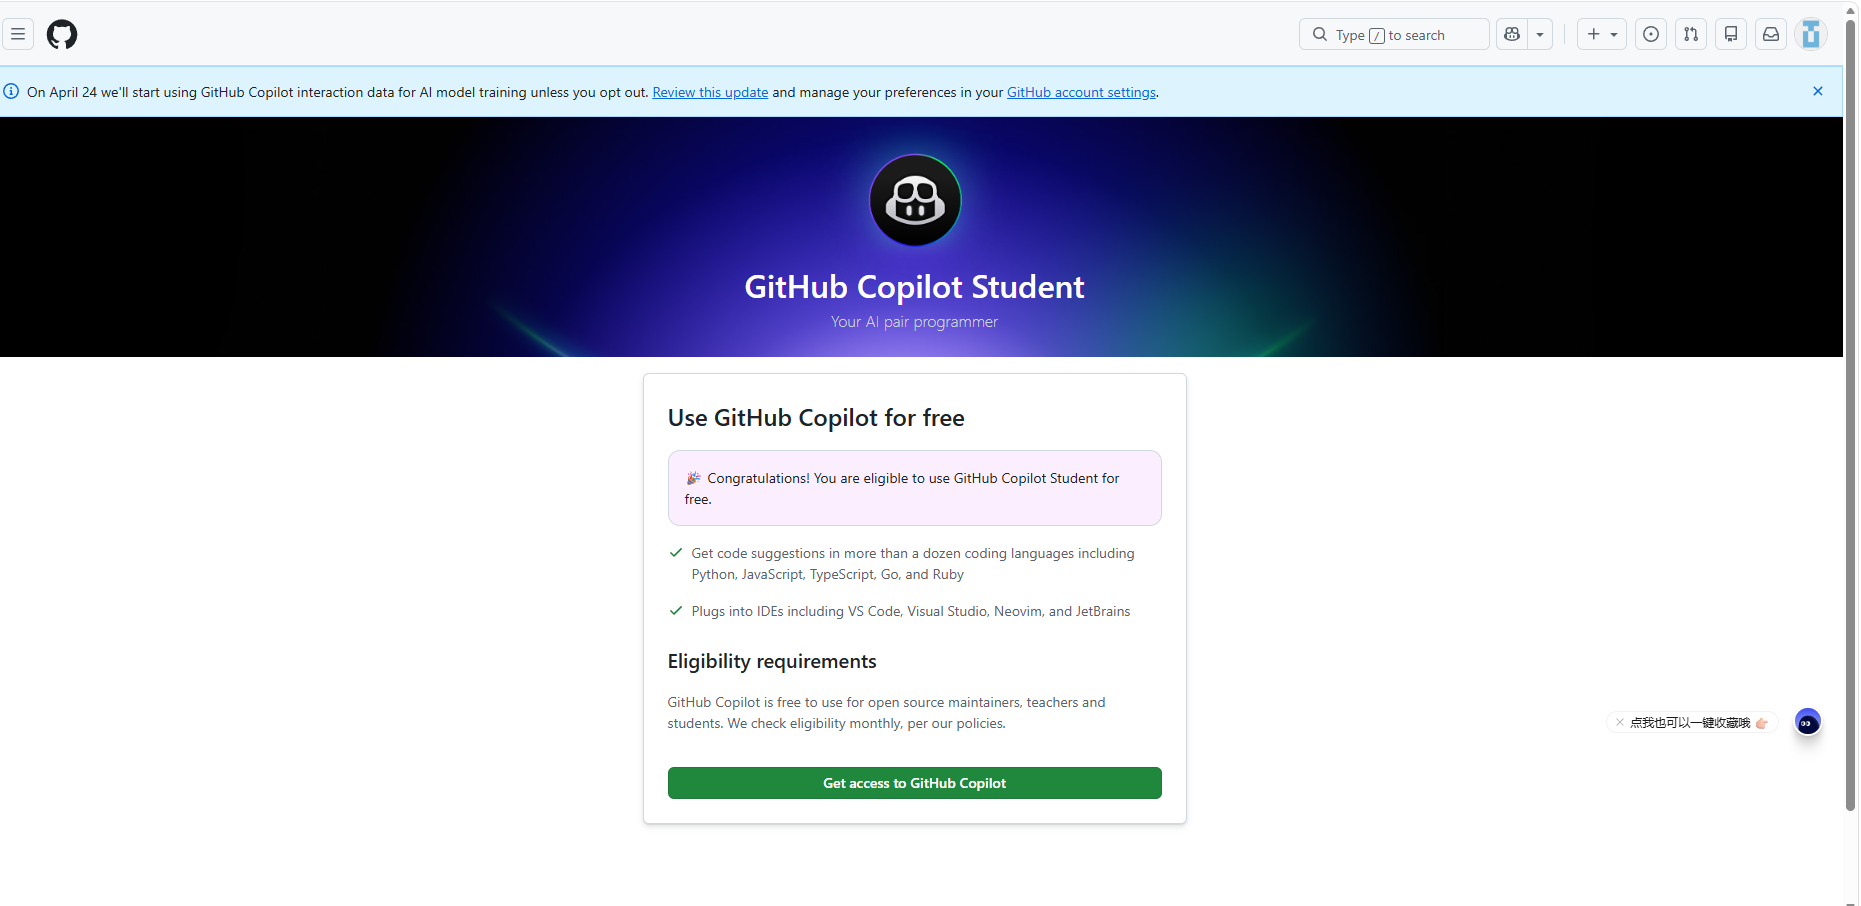
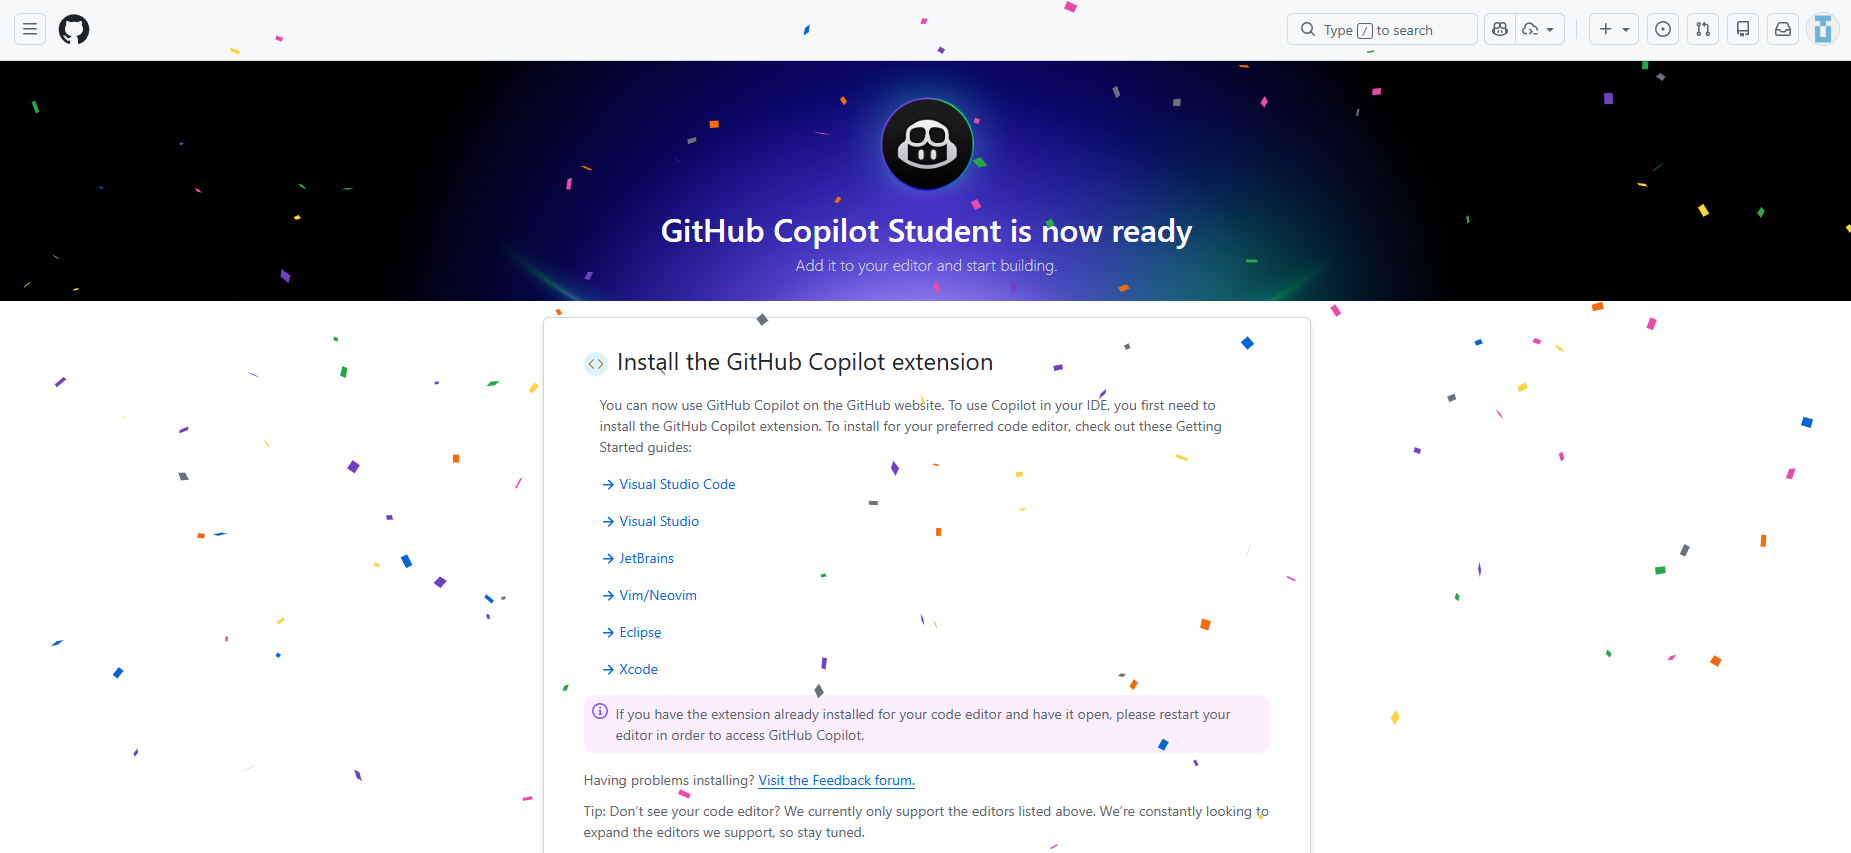
Step 5: Claim Copilot Pro
Copilot benefits are no longer auto-activated. You need to claim them manually. Go to the GitHub Student Developer Pack page and find the Copilot offer.
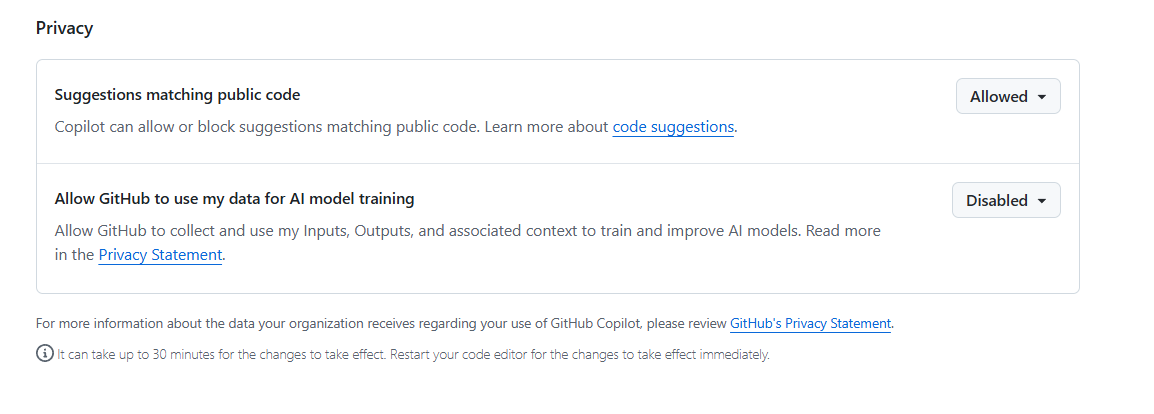
Step 6: Disable Data Collection (Privacy)
After claiming, heads up — Copilot’s updated terms mean your code data is opted into model training by default. You should turn this off.
Go to Copilot Settings → Features, scroll all the way down, and under Privacy, uncheck “Allow GitHub to use my code snippets for product improvements.”
That’s the process. Hope your application goes through smoothly — good luck starting your Agent journey.
May 6, 2026 Update
Shortly after writing this post, Copilot went through two major changes.
As of April 20, 2026, new signups for Copilot Pro, Copilot Pro+, and the Student plan are temporarily paused. That means even if your Student Pack gets approved right now, you can’t claim Copilot Pro — likely due to Copilot plan changes combined with compute capacity constraints. Then on April 28, Copilot announced it’s switching to AI Credits (pay-per-token) starting June 1. Didn’t expect that day to come so soon.
The benefits should come back eventually, so you might as well get verified now and see what other perks you can use in the meantime. Enjoy the free lunch while it’s still on the table.
Personal Thoughts
Honestly, the Copilot experience has been going downhill. First came the March announcement that premium models would require payment. Then April brought fewer and fewer available models, plus a five-hour cap and a weekly limit — I haven’t tracked it precisely, but about one to two hours of focused AI coding will trigger the five-hour limit, and the weekly cap fills up just as fast. The real pain is that once you hit the limit, the response cuts off mid-answer. To continue, you have to switch to auto mode (per the official docs), and I’ve tried switching a few times — the difference is night and day. Simple asks are fine, but anything remotely complex and the auto model can’t deliver. With token billing on the way, auto mode might not stay free either.
Probably just a resource crunch. Before April, Copilot was genuinely great — I’d max out my quota every single month. I get why they’re doing this, but the direction is clear: free agents aren’t going to be around forever.
After a lot of experimenting, I’ve started trying a new setup. DeepSeek V4 recently launched with a ridiculous price-to-performance ratio, perfect for students. I’m running Claude configured with DeepSeek V4 for agent workflows, and I’m currently deep-testing its capabilities. Might write a follow-up post on how to set it all up.
Enjoy Reading This Article?
Here are some more articles you might like to read next:
